Left turn at Albuquerque
(That’s whats up doc)
Yet another diversion
So I apologize dear reader, but after Tandy Assembly I had another diversion. I’d been reading about people having another device besides the FreHD that would allow them to be able to have a disk drive attached to the system. As part of my care package from Ira I received all the disks I sent and some additional ones on a USB stick. These were images that could be used in a device like the FreHD or the new one I heard of, a Gotek. I did a bit of googling and fell upon an article from Mike Smith called Upgrading the GOTEK Floppy Drive Emulator that he wrote and used on a Model 4. It looked like what I wanted to do, and since it emulated a standard drive that connects to the Model I also, I figured I’d reach out to him about it. He wasn’t sure, but looked forward to my trying it and reporting back. Let’s get deeper into TRS-80!
CHALLENGE ACCEPTED!! – TRS-80
As one never to shy away from a challenge I set out to do it myself. So the first part was to get all the hardware needed. In Mikes article I noticed he added a screen. I happened to find on eBay a newer version of the device he used that had a screen on it already.

I also bought the “USB-to-serial adapter with 3.3V output” from eBay since I wasn’t sure I had one with 3.3V or 5V so for the $4 it was worth it. He mentioned a 3.5>5.25 converter so figured if I made it a permanent part of things I’d want to put it into a disk enclosure so did that. I noticed that his cables to the Model 4 also seemed to be able to accept the header pins, but my Model I was more used to card edge. He did show a picture at the end of something to make life easier, and after a bit searching I was able to find it and order

So lets get to the configuring
Step 1 – Purchase an STM32 Bootloader from the HxC2001 project.
This wasn’t too bad. I was able to buy the firmware, especially because it was free for the summer. Once I registered I pinged the email address that it tells you to get it emailed to you. And waited, and waited, and waited. Nothing. I tried again the next day. Nothing. I contacted the support emails that I could find. Nothing. Then I had a stroke of , for lack of a better word, clarity. Given the fact I own all my own domains, I have the freedom to use anything I want as my username before the domain name. There’s generally a method to my madness, but if I explained it I’d have to terminate this connection. 😉 I had signed up for the software with one email address, but had been sending all my requests from a different one. So I changed my mailer to conform to the address I used to sign up and tried again. A few seconds later I got an email with what I’d been looking for. UGH. So II now had what I needed. PROGRESS! TRS-80
Step 2 – Connect GOTEK to USB Adapter.
This should have been easy. Mike suggests to add the pins in the holes to make your life easier. As being a bit allergic to soldering, I actually had an alternative. For other projects I’ve needed to add pins to, I had some Vlros Set of Hammer in Headers for Raspberry Pi Pico that I’ve been able to just use a pair of pliers and “cajole” them into place. So I snapped off the sizes I need and put them in the holes. I didn’t even need the pliers, they went right in. And then fell over. UGH, apparently the holes are too big. Now what? I guess I could sorta hold them at an angle to make a connection. This is what I decided to go with. Mostly progress!
Step 3 – Program the new Bootloader
I have to admit, this was a bit of a struggle. Getting help wasn’t as easy as Mike or the author claim it to be. The HxC2001 site is really difficult to navigate, understand, and find things. My post on the forum went unanswered. I floundered for quite a while on this. There ended up being a few issues.
The first issue was my unit wasn’t actually a STM32, it was an “Artery”. It was really difficult to find the instructions for this, and when I did they weren’t really clear. I found out from another HxC2001 page that besides the serial/pins, I could use a USB-A/USB-A cable, or a USB Stick. TRS-80
I looked into the USB option first, that’d probably be the easiest! Since I had one of the one of the Gotek models that had Firmware onboard already, all I THOUGHT needed to do is plug in a USB with the new firmware and it’d be as simple as that. It wasn’t. Turns out how many times I tried this it just didn’t work. And that I contribute to the documentation. Turns out I needed to program the bootloader anyway, so that left me with serial or USB cable. Given I was a bit iffy on the pins making the right contact, I opt’d for the cable route.
After FINALLY finding the right programmer, the right image, and the right cable I was finally able to get the bootloader onto it. PROGRESS! TRS-80
Ok, so now what?
So now that I had the drive loaded with the HxC2001 firmware, the connector on the header pins to be compatible with my drive cable, mounted in the 3.5>5.25 adapter, and connected to the molex pin of one of my floppy drive it was time to use it! BZZZT, wrong answer.
Mike points out there’s another step that you need to take. You need to create a configuration file to put in the root of any USB you attach to let the unit understand how to talk to the drive, since its not just made to be for TRS-80’s. Fortunately Mike linked to the configuration utility which I immediately downloaded and tried to configure. I followed what he said, but didn’t want to get greedy, so only configured it as one drive. I downloaded the file to the root of the USB Ira sent and plugged it in.
And AWAY we goooo
Well, actually no. Nothing happened. I went back to Mikes article and then noticed this –
IMPORTANT: Once you’ve downloaded DSK or DMK files, you will need to use the Floppy Drive Emulator software (the same software you used to create the HxC2001 configuration file) to load each image, then save them as HFE format files. The HxC2001 does not directly support TRS-80 floppy images, but the software allows you to change it into a format that works with the HxC2001 firmware.
MEH. Ok, well, at least it had a way to do it in bulk. So, went off and ran all my DSK’s into HFE format, and tried again. PROGRESS! I saw the filenames in my window and could use the rotary knob to switch between them, and when I found what I wanted, just press the knob to lock it in.
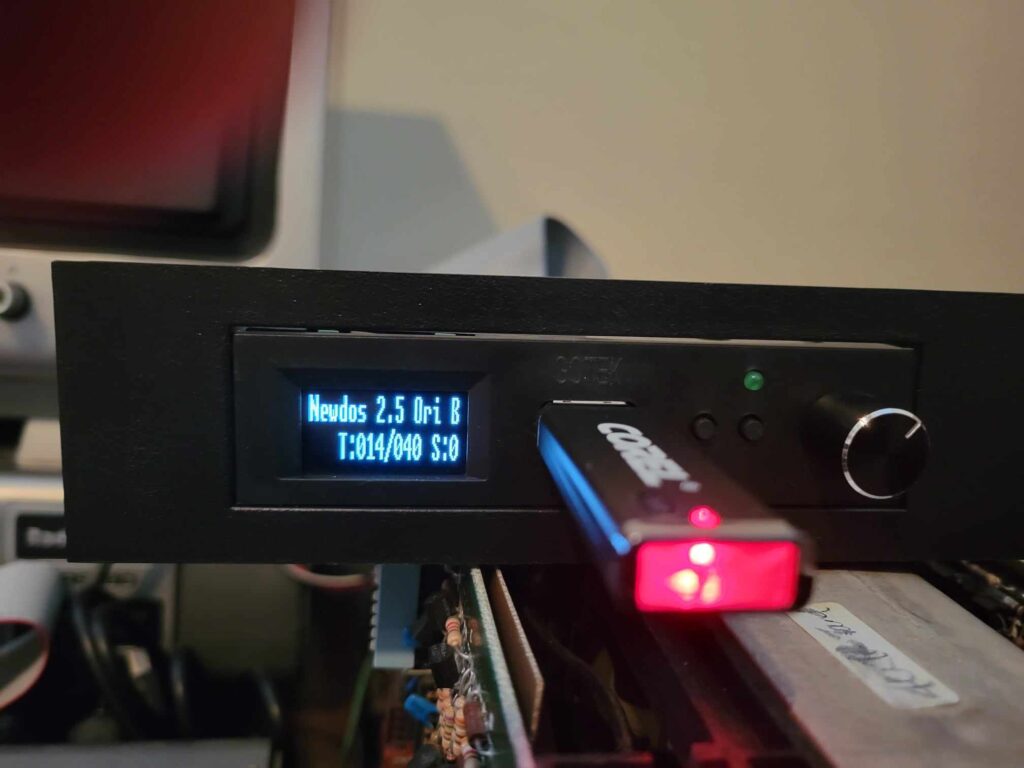
That was a copy of the NewDos/80 2.5 disk I sent Ira and he converted to a dsk for me which I converted to an HFE. It says its currently reading track 14 of 40, and Sector 0. Excuse the Corel USB stick, it was one I had from after my dad passed.
I rebooted and ZOOM, into NewDos/80 I went. The screen on the Gotek changed as different tracks and sectors were accessed! Pretty kewl. I could do anything I wanted as if it was a real drive. This was pretty sweet.
Great and all, but WHY?
So you’re probably wondering why I did this. My goal is to get the system online with as much original hardware as possible. I had gotten my 2 floppies out of storage working as horrible as they sounded, and I had bought 2 STILL IN BOX Shugart SA-400’s. So why do this?
It was kewl? I like toys? I’m curious about things? All of them? D, final answer. I still plan to get this running with as much of the original hardware as possible, but given the fact I’m going to have a lot of leftover hardware, thought it might be nice to build a Franken TRS-80, where it might be as much new/replacement tech as possible. That’s my story (for this at least) and I’m sticking to it!