(Not going to be published in this article)
My address – 192.168.33.247, Apartment 2323
If you’ve been following this closely. And I know not even my mother has been), the whole point of this project was to get this working to be available over the internet. It now works in my lab at telnet://192.168.33.247:2323 , but how to make it available on the Internet? I can probably do one of a few things :
- Buy space in a datacenter cololocation facility, put the entire setup into a rack. Get a vendor in the colo (How us kewl kids abbreviate colocation) to give me an internet connection with a dedicated IP.
- Buy a business level Cable account, which should give me a dedicated IP. And connect it only to the Model I.
- Decide that I don’t need to actually have it accessible over serial cable, but instead have some sort of remote KVM setup with a DynDNS setup. Let people actually talk directly to the machine (***PARTIAL FORESHADOWING FOR ANOTHER PROJECT***)
- Figure a way to get a public IP on the internet to be able to make its way into my lab and connect to my machine
Exploring the List!
#1
Going over that list, one is very doable. I used to run a Managed Server Hosting company long ago and far away (No links, I sold the domain name years later). So I have all the equipment I’d need, I’d just need to contact a datacenter and buy the rack/power/connectivity. This is all well and good, but the last time that ran me about $2500 a month. That’s a bit more than I want to pay.
#2
For two, most cable/dsl and even Starlink (I have this at another site) aren’t big on inbound connections. My Starlink definitely doesn’t allow it. My DSL does only because I pay extra for a dedicated IP, and I’ve never actually tried on my Cable. I probably could do it on the cable, but since my IP changes here and there, I’d need some sort of way to keep things in sync between the IP and the DNS.
#3
For three, the TRS-80 Model I has a composite video, and the keyboard is integrated to the CPU. One would need some sort of device to turn the composite into something a KVM could use (Like HDMI if you’re using PiKVM), and somehow be able to interface a USB keyboard with the Model I. Maybe I can take some sort of ESP32 and map things out. Possible, but not at the moment. (Is this a spoiler alert? 😉 )
#4
For four, lets see what you’d need. First of all, I’d need to know I had a permanent set of IP addresses that are mine and never would change, no matter what. Its funny, since I actually have two /24 subnets I own. Yes, OWN. See, most of the IP addresses for websites all over the US are in effect “LICENSED” by an organization in the US called ARIN, which is American Registry for Internet Numbers. You request IPs from them, and you pay a yearly fee for them.
They manage EVERY IP allocated in the US. So how can I claim that I OWN them? Well, see, ARIN was only established in late 1997. I received one block of /24 in early 1992 from the people that doled them out then, and the other as a birthday present in 1994. Those are considered “LEGACY”, and as such aren’t subject to most of the requirements of ARIN. As long as I still actively use them, I have ownership of them. I’d then need some way to get these IPs to be able to route the packets all the way to my machine.
Oooh, I have an app for that
So as I’ve mentioned, I own the 2 sets of IPs, and needed to use them. So way back I had some colo in a datacenter in NYC, and paid $2500 a month for running a bunch of servers I took with me after I put my Managed Server Hosting company to bed. It was great to be able to continue doing all the fun stuff. I loved playing with routing, switching, load balancing, etc. Well, I loved it until disk drives failed, servers failed, networking gear failed.
Ok, I hated failure. Not to mention I was hating the cost. That’s kinda expensive for just running a few webservers, mail servers, IRC, and other stuff I played with and then having to deal with hardware failures. Given the fact that now there was this thing that was called “The Cloud” existed, it made sense to move everything there. But, the problem with the cloud is that you can only use their IPs unless you also used their VPNs and other facilities. And those cost more than I was willing to pay.
If you build it, the packets will come
I decided to see if there was a way to be able to get around the expenses that I’d incur using a fully (CLOUD PROVIDER NAME) solution would incur. Given also the recent gig economy, I found a site (I’d also mention them, but I’ve had more failures with projects there than good so don’t want to give them any free advertising) that would allow me to specify what I wanted someone to design and write for me.
So thinking about it –
- I need to be able to use the IPs allocated to me
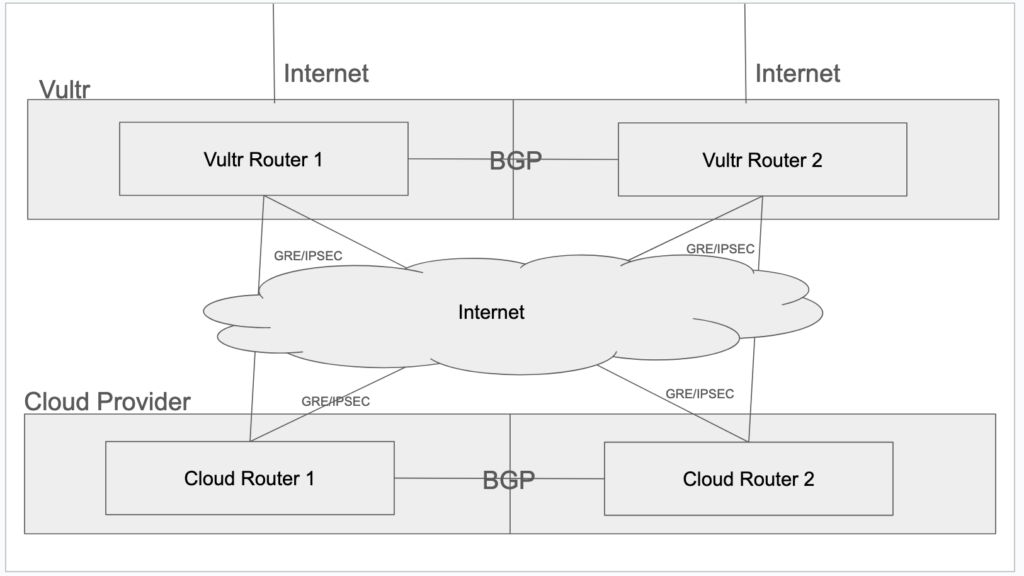
- I wanted to be able to use the normal method of advertising those IPs over the internet myself (This is called Border Gateway Protocol or BGP)
- I needed a way to get that traffic from the BGP point, over a secure and encrypted method into the cloud provider
- I wanted to be able to have a totally variable mapping of the inbound IP/port to an IP/port in my cloud. So if I wanted 3 IPs to point to the same machine, or 5 ports on 9 IPs to go to 1 machine, I could do that. I also wanted to be able to control if my systems reached outbound what the IP would look like, and especially if it was going outbound on a specific port (I could have 3 internal mail servers all appear as 1 without any sort of masquerade or such)
- I wanted this to be redundant on both ends. If one of the “routers” failed, another needed to take over.
- It needed to be able to be installed automatically and repeatable
The Next Revelation
I found a developer that said he could do it, at a reasonable price. And off we went! I’ll save you the story of the development, but here’s how things go. I use a provider called Vultr that would allow me to set up 2 virtual machines, including a shared virtual network, and provide me the ability to use BGP with them. Its only about $40 a month per machine, and I over-provisioned them so probably could cut down the cost if I wanted to.
The developer created the installation scripts in a language called “Ansible“, which I had to give it some basic information (The subnets I owned, a BGP “neighbor” number that I used with Vultr, the IPs of the 2 machines in the cloud provider, information about the routing in the cloud, etc). When I ran it, it loaded and configured all the software necessary on both ends.
I won’t go into it all, but it created IPSEC under a GRE tunnel between the 2 routers, that passed the BGP information, and then there was a special NAT/PAT that ended up getting the traffic to the right machine and port internally. It looks something like (Please excuse the poor drawing)
Now, I can run as many servers in the cloud as I wanted, and forward the IPs and ports at my discretion. Shweet, huh? I now am running about 17 servers in that provider, and it costs me about $250 a month. So I’m doing more, with less, for $330 a month instead of $2500. AND, hardware failures AIN’T MY PROBLEM!
Ok, yea, sure, that’s great, but your Model I isn’t in the cloud!
Yes, absolutely right. But, that was the first step long ago. There are 4 main places I would need to get information back and forth with each other. My cloud servers, my lab, my site in NC, and my moms house. If only there was some way to be able to network all that together without dedicated lines, and a bit simpler than the above. OPENVPN!
The First Step
The first step of all this was a bit of IP renumbering. I sorta had a habit of everywhere I set up networks, I set them up with the same IP address range, 192.168.3.0/24. If I put 3 networks together which all had the same IP (The cloud used a 172. subnet, so it was different) there would be even MORE fun to have. Given that the NC site had the most networking of the 3, I left that alone. I converted my lab to be 192.168.33.0/24 (With 192.168.34.0/24 for a zoned off network for testing) and moms became 192.168.133.0/24 (See what I’m doing there? 😉 ).
Great, I have all new IPs, nothing clashed, but it still means I can’t just ping 192.168.3.254 from 192.168.33.254 (My routers in every location are .254) and it magically works. So, the next piece of the puzzle.
The Next Step
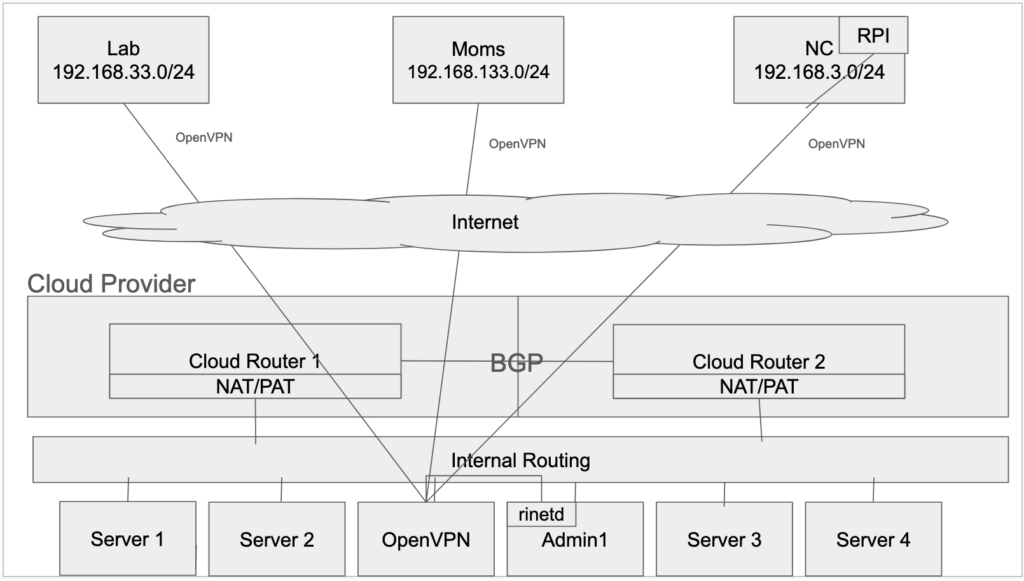
I set up a virtual server in the cloud provider, and decided to make that the “hub” of my setup. It made the most sense since I had the most control and open connectivity. I then set up OpenVPN on the routers at the lab and moms (I standardized on the Linksys E8450 running OpenWrt on them, since I wanted the most control over my network at each location).
Configured each of the spokes to talk to the central hub, and also told the hub to inform each spoke that it knew how to get to the other networks. Had to do things a bit differently at the NC site. My router there is a Cisco 3945e/k9. Yea, serious equipment. I told you that the site was a biggie. I have about 70 IP based items there from thermostats, to cameras, to environmental sensors, etc.
The problem there is that the 3945 doesn’t run OpenVPN. In that situation, I have a cluster of 4 Raspberry Pi’s running, each with the ability to take over the tasks of one if it dies. I installed the OpenVPN there, and then told the router that if any traffic ended up there to forward it to the Raspberry Pi running the OpenVPN server.
With this setup, I now have virtual connectivity to each location. (Yes, I could set up a mesh, but I didn’t, too many moving parts) If I want to get to a item in moms from an item in the lab, I just use its IP. It travels out the router over OpenVPN to the cloud, and then the cloud forwards it along to moms. Like this\
Going that LAST mile
Finally, its time to get the data from the cloud to the lab. Unfortunately, I couldn’t just put a NAT/PAT rule at the cloud router. The reason is the information would actually make it all the way to the device, but then the device would see that it came from a public IP, and route it back out the normal internet connection with a locally NAT’d IP, and that just failed.
So I needed a way to internally NAT it again. This time, I took something called “rinetd” and put it on one of the servers already running. It would forward from the router to the machine showing the public IP address, but then rinetd would contact the Lantronix in the lab using IT’S private IP address. This meant the Lantronix wouldn’t try to go back over the internet, but back to the private cloud IP, and then back out the router to the destination. I just needed a rule that looked like –
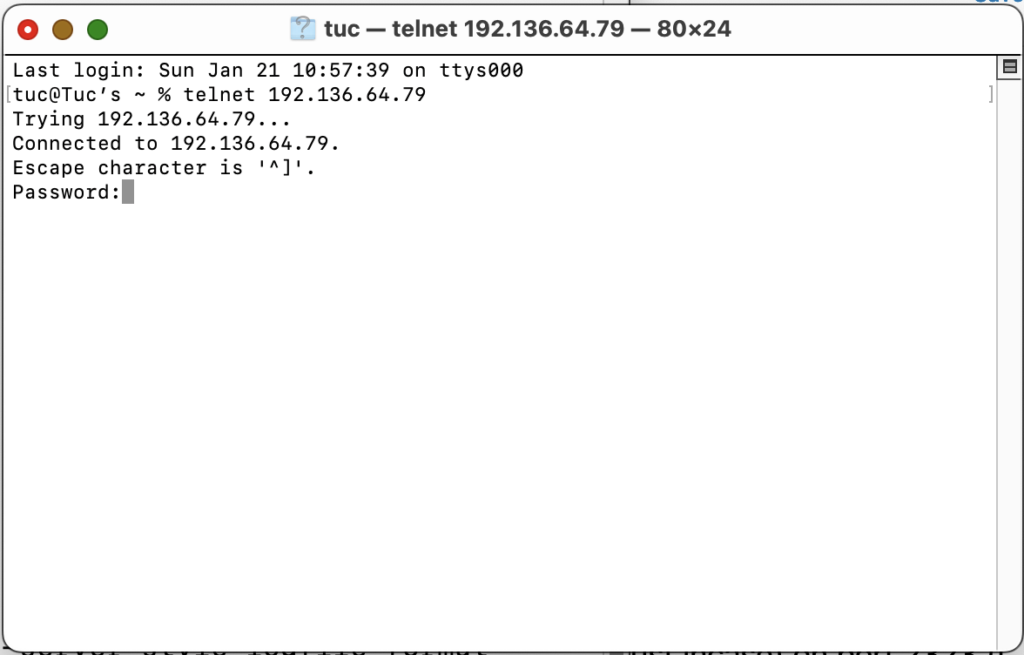
0.0.0.0 2323 192.168.33.247 2323This meant that the cloud server should listen on all its IPs (It only had 1, but just in case) on port 2323 (I changed the standard port 23 at the router to be 2323 to keep things consistent internally) and forward it to 192.168.33.247 (Lantronix in the lab) port 2323. SUCCESS! From anywhere in the world, I could telnet to the DNS name, and it would make it all the way to my Lantronix and back
GREAT, RIGHT?!?!? Well, sorta.
UGH, why SORTA now Tuc?
So one of the other functions that rinetd has is
logfile /var/log/rinetd.logWithin *95 seconds* of getting it running, I started to see in the log –
XX/Jan/2024:14:57:42 60.56.49.63 0.0.0.0 2323 192.168.33.247 2323
0 0 opened
XX/Jan/2024:14:57:52 185.117.3.139 0.0.0.0 2323 192.168.33.247 2323
0 0 opened
Um, that’s not any public IP I use. That means that in less than 2 minutes of sitting on the internet, scanner or hackers were already probing my system. How many could there be, right? Well, a bit. Its been running for 11 days, and there have been SEVEN THOUSAND THREE HUNDRED AND SEVENTY FIVE attempts from TWO THOUSAND FIVE HUNDRED FORTY EIGHT unique IP’s. Yea, that’s not going to work out well.
I didn’t wait 11 days to do this, as I saw the first connections come in I decided to put a password on the Lantronix. At least it’d stop them messing with the machine for now. Hence, the password prompt you’ve seen on the telnet sessions. I can already here you asking “SO WHY NOT CHANGE THE PORT TO SOMETHING NOT STANDARD TUC?!“. And you’re right. But, I did this purposely to see exactly how bad the situation was going to be. So, I just changed the router from inbound port 23 (Default telnet port, I don’t think I mentioned that earlier) to 2323. I’ll let this run for a bit and report on it then. (FYI – I passed 96 seconds without incident)
Tailscale may be an easier option for linking all of the sites together (and faster since it’s based on wireguard). I have just started converting my networks over to using it and it is encouraging so far.
The scanners will find you on any port eventually. I do mostly windows server machines and need RDP access and found a nice utility that basically just looks at the connection logs for failures on a timed basis and then adds temporary firewall rules to drop their packets for predetermined amount of time. Worked great. Not sure if the same thing can happen for telnet (to be able to see good/bad logins) but it seems to be more reliable than the traditional methods of filtering the network traffic.
Will be interesting to see it when it’s all done!
Hey Joe, great to see you!! Hadn’t run into Tailscale before. Looks interesting, I’ll have to see if it can run on the same platforms I’m using OpenVPN (OpenWRT, Raspberry Pi, Mac, Android)
And yea, I know, but 23 is much more prevalent than 2323.And yea, since Jan 22 there have been 5593 attempts at that port, only 3 actual logins (One of which was you, thanks!) I do use
fail2banfor other excessive attempts, maybe I’ll put it here. But having the password helps. 😉